This is my very first picture tutorial,
I hope it makes sense.
For this frame you do not need glue, scissors or tape.
What you need to end up with a 6" square frame is,
1 sheet of 12" x 12" paper, long piece of ribbon, and 4 brads.
get the paper and fold in half and mark the centre of the fold only,
repeat this the other way as well so you get a small folded cross in the centre of the paper.
Can be made any size using a SQUARE of paper.

Then fold all 4 corners into that centre cross and bone fold the edge.


once all 4 corners are folded into the centre, turn it over so the solid side is facing up,
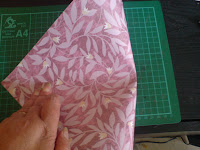
then take the 4 corners one at a time to the centre again and bone fold the edge.


The above photo shows how it looks now, similar to a square envelope.
then take the point of each of the 4 pieces (from the centre) and fold back so it meets the edge of the square and bone fold.

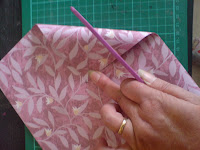
the picture below shows all 4 done.

where the corner meets the edge of the square, use a pokey tool to make a hole in each
of the 4 sections, (this is where the brad will go - but not yet)

put your chosen ribbon around all four pieces under the little flaps,
do not fasten of ribbon yet.
Then with ribbon under the little flaps put your brads through the two layers of paper,
these two layers are the little pointed corner and the piece under it,
NOT THE BACK OF THE FRAME.


Then you can tie the ribbon, and cut of any excess.
this is how it should look now.

Turn it over, and if you want your ribbon at the top when its standing make sure you
do the bottom two squares.
Fold two squares down to make trianles .
these make the stands which should be at the bottom of your frame for it to stand.

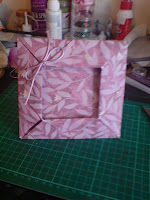
it will look like this when done and standing.

If it is not strong enough you can always add a little card to each of the supporting
triangles at the back. (the white bits in the above photo)
This is how it looks standing on its own supported by the two folded triangle supports at the back.

You can either put a card in here, as the ribbon can be undone and done up
whenever you want to, or you can use it as a picture frame.
Hope It has helped you.
Please let me know if you like my tutorial,
and if you have any questions please ask.
I dont know who did the original so if it was you please let me know
so I can give credit where its due.
Hugs
Angie
x X x


23 comments:
Thanks for the tutorial!!! I think the pics are very clear...I 'll try it soon.... nice blog
WOW!!!!! Great job! What a neat tutorial!!
Urm .. Like this idea BIG TIME , gonna go and try this .. got to , well it would be rude not to , lol
Hi Angie, thankyou for the fab tutorial, what a great frame I will have to have a go at one of these they are lovely. xxxxx
FANTASTIC! Thanks so much - pictures and directions are clear and easy to understand. You're great! ~chris
What a lovely tutorial and a great idea ...looking forward to making one of these. I am going to make sure I bookmark your tag for the future. Thanks angie from pcu!!!
Ohhh my this is sooo cool! Thank you so much for taking the time to do this tutorial with pics! You make it look and sound sooo easy! :)
oh fab hun thats very pretty & effective I think I will have a go at that later x
Angie, this is a fab tutorial, the pics are great and the instructions are really clear - well done, thanks for sharing. Nicki, xx
Wonderful tutorial....I will be back to try this out.
Great tutorial, will give this a try!!
Twiggy x
Great tutorial!! Not sure I'm brave enough to try this yet.
I'll have to give this a go soon, thanks
Thanks for the tutorial, Angie!Great job!
Fabulous tutorial Angie. I posted my card on PCU for you to see. Must try a 12 x 12 as well for a larger photo.
Thanks Angie from PCU. Craftyjoblue x
Fab tutorial and I am really pleased with my little frame, I used a 6" square. Thank you for sharing.
Sharon x
This is gorgeous!! Thanks so much for showing us how it's done!!
I know only a little while ago I left a comment, but I'm back to tell you I just made my very own frame!! Thanks so much, it was so quick to make and simple. It's super cute, can't wait to find a pic to fill it. You can view it here http://laurasfreetimefiller.blogspot.com/2009/09/12x12-picture-frame.html
Thanks again!
THANK YOU!!!!!!!!!
-- dalis
thanks for a great tutorial Angie, will have to give this a try
hugs, Valerie
very easy tut, well done.
Carolynne
Great job on the tutorial Angie. I haven't had time to get here before now but I'm going to have to try this one. Cool idea! Thanks for sharing the tutorial!
Great paper frame, this could be used in a scrapbook also! So I'm trying it out!
Thanks again!
DPP
Post a Comment